The process by which files are transferred to the web server is called "FTP" (File Transport Protocol). You have unlimited access via FTP 24-hours a day. As such, you can create and maintain your web pages on your own computer and upload files to your web site at your leisure. Internet providers such as AOL, CompuServe, and Prodigy may have a built-in FTP interface. If you have a PPP internet account and need an FTP program. Configuring Your FTP SoftwareThe following information is contained within your account activation notice and is needed to connect to your web site via FTP:
Each time you run WS_FTP the Session Profile window will be displayed. A profile contains the information needed to connect to your web site. Creating a profile now will eliminate the need for you to configure the software each time you wish to connect to the web server via FTP. To create a new profile, click the "New" button and enter a generic profile name at the top of the Session Profile window. Next, enter the userid, password and hostname for your web site as illustrated below. 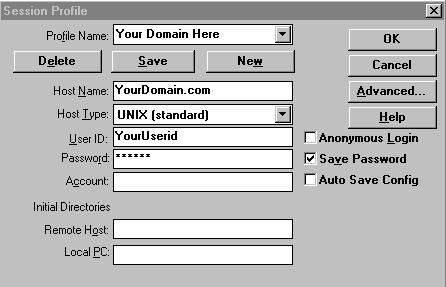 Be sure to always select "Automatic Detect"
for the Host Type. (see
Fig.1) It is best to select "Save Password" and
"Auto Save Config" to maintain these settings
for future use. All other fields can be left blank. You
are now ready to connect to the web server. Click
"Ok" to continue. How to Transfer FilesWhen you connect to the web server, you will connect directly to the root ("home") directory of your account. WS_FTP will display a split screen where files on the left-hand side are within your own computer. You will see several folders on the right-hand side such as www, and infobots which are landmarks suggesting a successful connection to your web site.You need to click on www to get to your web directory, this is where all your files will be downloaded, and/or you will create subdirectories. The only system directory that you may need to use is cgi-bin; this directory is reserved for custom scripts. To make your home page load automatically, name the HTML document "index.htm" in lowercase and upload it to the www directory of your account. To upload a file or files, simply highlight the file(s) on the left and click the right-arrow button (=>) in the center of the screen. Be sure to upload HTML documents and scripts in ASCII mode and images in BINARY mode. To transfer a file to a subdirectory, double-click the appropriate subdirectory to open it before transferring the desired file(s). As soon as a file is uploaded to the web server, it is available for all to see. If, after uploading a file, you are still unable to see the updated file via Netscape, you need to clear both disk and browser cache. This function can be found by selecting Options > Network Preferences in Netscape. Remember that you must first be connected to the internet through your local internet service provider in order to connect to the web server.  Notes to Mac Users
|